

I. Introduction to the Measurement Interface of the SF6 Integrated Tester:
The measurement interface is shown in the figure below:
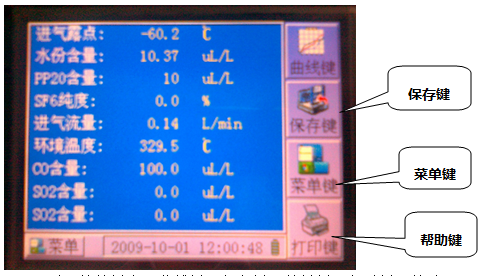
After entering the "Measurement Interface", the soft keys include: Curve key, Save key, Menu key, and Help key. Press the corresponding key to enter the "Curve Interface", "Save Interface", "Menu Interface", and "Help Interface". At the same time, you can also see measurement values such as dew point, moisture content, pressure, flow rate, ambient temperature, SO2, H2S, CO, PP20, etc.
II. Introduction to the Save Interface of the SF6 Integrated Tester
The save interface is shown in the figure below:
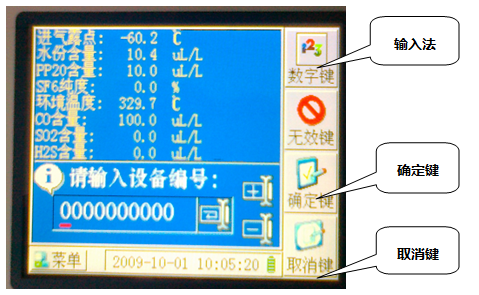
After entering the "Save Interface", the soft keys include: Input method, OK key, and Cancel key.
It is recommended that you save the data after correctly entering the device number. Press the [OK key] to save the data and return to the "Measurement Interface". Press the [Cancel key] to return to the "Measurement Interface". Press the [Input method] key to switch among three input methods: "Number keys", "Uppercase letters", and "Lowercase letters". Press the [◄] key to move the cursor position, and press the [+] or [—] key to increase or decrease the numeric value or letter order.
III. Introduction to the Menu Interface
The menu interface is shown in the figure below:
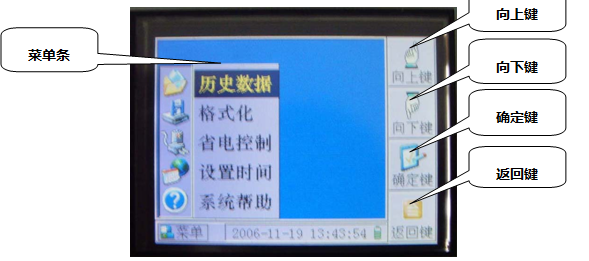
After entering the "Menu Interface", the soft keys include: [Up key], [Down key], [OK key], and [Return key].
In this interface, you can see five menu items: "Historical Data", "Format", "Power Saving Control", "Set Time", and "System Help". Press the [Up key] or [Down key] to move the menu bar to the desired position. Press the [OK key] to select that menu item and automatically enter the corresponding function interface. Press the [Return key] to return to the "Measurement Interface" or the "Dew Point Sensor Calibration" interface (if the sensor 6-minute calibration has not been completed).
IV. Introduction to the Power Saving Control Interface of the SF6 Integrated Tester
The power saving control interface is shown in the figure below:
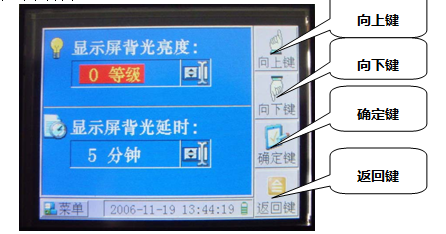
After entering the "Power Saving Control" interface, the soft keys include: [Up key], [Down key], [OK key], and [Return key].
In this interface, you can see two options: Display Delay and Backlight Brightness. Display Delay means that if no key is pressed within the specified time, the system will automatically turn off the LCD screen until any key is pressed to automatically turn the display back on. The display delay can be set from 0 to 30 minutes, with a step of 5 minutes. 0 minutes disables the display delay function. Backlight brightness has 8 levels (0-7), where 0 is the dimmest and 7 is the brightest. Press the Up key or Down key to move the setting cursor to the desired item. Press [▲] or [▼] to change the value in the selected item. Press the [OK key] to save the settings. Press the [Return key] to return to the "Menu Interface".
Note: The power saving mode settings help extend battery life.
V. Common Problems with the SF6 Integrated Tester
► How long does charging generally take? When is charging needed? When is charging complete?
Each charging time varies depending on the actual remaining battery level, generally less than 12 hours. When the battery level indicator shows insufficient power, charge it promptly. It is not advisable to fully discharge the battery to ensure its service life. The charging circuit is equipped with overcharge protection. When the battery is fully charged, the charging indicator light will change from red to green.
► How often does the SF6 Integrated Tester need calibration and maintenance?
It is generally recommended that users calibrate once every 2 years, and in special cases once every six months (when the gas path is heavily contaminated).
► Why does the instrument stall during measurement and then the data drops?
The content is incomplete. Please provide the full text for translation.
