III. Main Technical Indicators
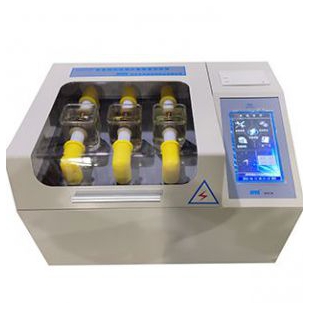
Ø Output Voltage: 0kV~80kV
Ø Booster Capacity: 1.5kVA
Ø Boosting Speed: 0.5,1.0,1.5,2.0,2.5,3.0,3.5,4.0,4.5,5.0kV/s (Optional)
Ø Voltage Measurement Error: ±3%
Ø Power: 200W
Ø Total Voltage Harmonic Distortion Rate: <3%
Ø Dimensions: 555mm×390mm×415mm (L×W×H), Weight: 42kg
IV. Operating Conditions
² Power Supply Voltage: AC 220V±22V
² Power Frequency: 50Hz ±2.5Hz
² Ambient Temperature: 0℃~+40℃
² Relative Humidity: <80%
V. Operation
(I) Standby Interface Description
After power-on, enter the standby interface with four options:
Parameter Settings - Set system and test parameters;
Start Test - Perform breakdown test according to test parameters;
Historical Data - View and print saved test results;
Others - Instrument description or some system settings, etc.
Voltage Calibration - Calibrate the output voltage of the instrument.
Additionally, there are temperature and humidity display and clock display settings.
(II) Operating Instructions
1. Parameter Settings
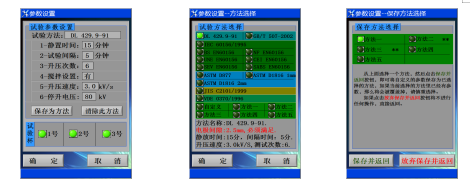
On the standby interface, click Parameter Settings to enter the parameter setting interface.
Click on Test Method to enter the method selection interface. After selecting a test method, click the OK button to return to the parameter setting interface. The selected method will be displayed at the Test Method field, and the parameters of that method will be shown below.
If a non-custom method is selected, the parameters are preset and cannot be modified.
When selecting a custom method, click on each parameter to modify it. Each parameter has a setting range:
Standing Time: 0-15 minutes; Test Interval: 0-5 minutes;
Number of Boosts: 1-10 times; Stirring Setting: Yes or No;
Boosting Speed: 0.5-5.0kV/s, increment interval 0.5;
Stop Boost Voltage: 10-80kV, increment interval 10kV;
After setting, click the Save as Method button to enter the save method selection interface. Select a method and click Save and Return to save the custom parameters as one of the 5 self-defined methods. If the selected method already has parameters, they will be overwritten. (Methods marked with "**" indicate that the method has been defined)
After selecting one of the 5 self-defined methods, you can click the Clear This Method button on the parameter setting interface to delete this method.
2. Start Test
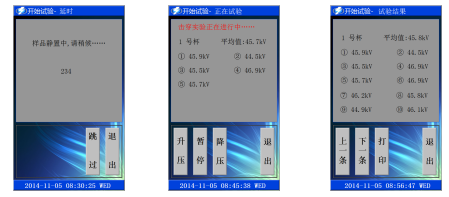
On the standby interface, click the Start Test icon. First, enter the delay interface to allow the sample to stand for a delay, as shown on the left above. Then start the breakdown test, as shown in the middle above. During the test, you can click the Pause, Boost, or Reduce buttons to operate. Click Exit to return directly to the standby interface. According to the set parameters
After the test ends, enter the test result interface, as shown on the right above. You can view the test results of this test. If automatic printing is set, the test data of this test will be printed automatically; you can also click the Print button to print the test data of each cup separately. Use the Previous or Next buttons to view the test results of other cups.
3. Historical Data
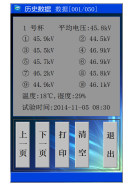 On the standby interface, click the Historical Data icon. If there is no data in the current memory, it will exit directly and return to the standby interface. Otherwise, it will enter the historical data interface. The top displays the total amount of data and the position of the current data; according to the first-in-first-out principle, the displayed data is always the test results. Click Previous Page and Next Page to display other test data; click the Print button to print the currently displayed data; click the Clear button to clear all data in the memory; click the Exit button to return to the standby interface.